Pages

Wednesday 31 August 2011

'Sew Simple' - New Patterns by Simplicity... a short update


Image Source: www.simplicity.com

Just a short little post - but it seems like Simplicity have eventually remembered that they've produced this new line - and at $1.99 USD per pattern, the prices are pretty good! That's about £1.22 GBP at current exchange rates.

On the official UK site (selling both Simplicity and New Look patterns), the 'Sew Simple' section shows 70 styles currently on offer - each priced at £3.45 (which is erm, about $5.60... so getting on towards x3 times the price of the US website - boo!). The range offer Misses (grown-up ladies LOL!), little girls (but no boys), home decor patterns, soft toys, doll's clothes, bags and even a dog costume and coat!

Images Source: www.simplicity.com


<br>But there's only one solitary men's top... ahhh men you don't get much in the way of patterns do you :( ?

... 2 dog patterns to 1 men's is a very poor ratio indeed *sighs*!

Thursday 25 August 2011

Feel The Fear And Overlock It Anyway!


UPDATE: 11-Dec-2015 For anybody searching for an Instruction Manual / User Guide for the Delta OL-1000 Overlocker (Serger) machine, please check out my blog post here thank you :-).


04 Overlocker - Front
My 'Delta OL-1000 Overlocker' (Serger) straight out of the box new. (More pics here)
To paraphrase the Susan Jeffers book, I recently decided I ought to Feel the Fear and Do it Anyway when it came to learning how to use my overlocker!

I've been spurred onto this by a number of things:
a) I bought the darned thing before Christmas last year (errmm... hello it's nearly 8 months later and I've only taken it out of the box a measly once to check nothing was missing).
b) I've bought umpteen number of books + DVD on the subject of serging/overlocking
c)  Everyone else is diving on into the overlocking swimming pool with either first-time machines (Karen, Catherine, Patty, Tilly, Vicki) or replacement machines (Kristy). Whereas, I've not even dipped my toes into the metaphorical shallow-end - instead I'm doing a great impression of a water-phobic chicken :( !! 

So... after seeing Karen's post about her new Brother Overlocker, I thought it was high time to inflatable my armbands and leap get my feet wet. I dropped the lovely Karen a quick email, suggesting that the both of us as newbies to overlocking get ourselves onto a short evening class to learn the basics, like threading, tension adjustments etc..

So, this evening (technically yesterday evening, but I haven't gone to bed yet so whatev' LOL!) we met up at The Make Lounge in Islington where we had booked onto their short class, described as:


"  Overlocking Made Easy Class   
   •  Level: All
   •  Course length: One 2-hour session

With their ability to simultaneously cut and stitch a hem, overlocking machines are incredibly useful for decorating, reinforcing and constructing garments and other items. But they can be a bit intimidating!

In this 2-hour workshop, we’ll demystify the overlocker by teaching you how to thread, adjust tension and differential feed, and deal with corners and curves. You’ll leave the workshop with a pair of rolled hem napkins you’ve made yourself, in your choice of more than 100 gorgeous solid or printed fabrics! "

Now, the lovely thing is, I'd phoned them up last week to ask if we could bring along our own machines to the class (the answer was yes - I just had to remember to bring the power lead, and the manual). My reasoning was that even though they provide their own onsite machines for students, if I am new to all of this overlocking lark, then I want to learn the ins the outs, the tweaks, tips 'n' tricks on my own machine - afterall it is what I'll be using afterwards at home isn't it? So, I managed to lug my machine (I kept it in the box / packaging I bought it with for extra protection) all the way to work wrapped in one of my many trusty IKEA big blue bags that keep in the house (LOL!) to ward of the raindrops and stuffed into a strong trolley. Karen also decided wheelie-was-best, and brought her overlocker in a pull along suitcase (sensible lass!)


Image Source: http://www.ikea.com/gb/en/catalog/products/17228340
"Oh, IKEA FRAKTA bag... for 40p is there nothing awkward or heavy that you CANNOT carry ;) ?"

EDIT: If you are able to take your own overlocker machine to a class then:
a) make sure you take the pedal, power cable, manual and any tools/tweezers/extra needle plates/screwdrivers that come with it along with you too!
b) check the manual for how/where to adjust your differential feed (and check that the dial/thumbscrew will move - if like mine the thumbscrew won't budge at all, try some pliers at home before you attend the class to save yourself trouble on the night)
c) if at all possible forward a PDF copy (or a web-link to find it) to your teacher in advance. Then they can familiarise themselves with your model before you arrive, and be in the best position to assist you.

I didn't do b) or c) but Suzanne managed admirably. Though I think things would have gone easier for me if I'd done b), and I'm sure c) would've been useful to Suzanne too :). I photocopied the threading pages from my black and white manual and coloured them in to match my thread colours before the class - and that helped me loads with the threading :)!

The nice people at 'The Make Lounge' actually provide drinks and snacks for us - very civilized I must say! Plus, there were only 4 students in total on the night (the maximum they run with is 10) - so we had loads of time with our teacher to pester her with questions.


Outside of 'The Make Lounge' at Venue 2:
The Make Lounge - Craft Workshops (Venue 2 at 41½ Barnsbury Street) The Make Lounge - Craft Workshops (Venue 2 at 41½ Barnsbury Street)

Inside of our class room:
The Make Lounge - Craft Workshops (Venue 2 at 41½ Barnsbury Street) The Make Lounge - Craft Workshops (Venue 2 at 41½ Barnsbury Street) The Make Lounge - Craft Workshops (Venue 2 at 41½ Barnsbury Street)

And, here's their shop a few doors down on the same road (where we picked out our napkin fabric).
The Make Lounge - Craft Workshops (Shop/ Venue 1 at 49-51 Barnsbury Street) The Make Lounge - Craft Workshops (Shop/ Venue 1 at 49-51 Barnsbury Street) The Make Lounge - Craft Workshops (Shop/ Venue 1 at 49-51 Barnsbury Street)

The Make Lounge - Craft Workshops (Shop/ Venue 1 at 49-51 Barnsbury Street) The Make Lounge - Craft Workshops (Shop/ Venue 1 at 49-51 Barnsbury Street) The Make Lounge - Craft Workshops (Shop/ Venue 1 at 49-51 Barnsbury Street)


I'd decided to bring my own cones of thread with me in blue, green, red, and yellow. The colours to match the dials on my machine (which strangely don't tally between the machine itself and the manual, but that's a topic for a different post) - and I reasoned that I'd more easily be able to spot problems with tension and threading if I could discern which coloured thread belonged where :)
My cones of thread came courtesy of some eBay purchasing months ago (SEEEEE!! I WAS getting ready to do some overlocking hehe! I just hadn't gotten around to starting anything as yet ;)! )

Our fab teacher was Suzanne Cowan, Suzanne was a beacon of knowledge, calmness and light for us. (Plus, Chloe was pretty darn lovely too - opening up their store down the road to help us to select and cut our fabric choices for our napkins making.)
" Suzanne Cowan has been involved in both book arts and fashion design for over 10 years. As a bookbinder she has travelled throughout Canada, the United States, and Taiwan teaching bookbinding to people of all ages while maintaining an online store and gallery featuring her own book works. With a formal education in both textile and fashion arts, Suzanne is well versed in the art of fabric manipulation as well as fashion illustration, patternmaking, and garment construction and has sold her clothing at a variety of boutiques throughout Canada."

I had some trouble adjusting the tension on my machine for very light weight cotton samples (the class provided us with plenty of swatches for practice). And, with Suzanne's help I got it to work great doing a basic stitch on medium weight cottons. We worked out that my differential feed (adjustable on my model via a thumbscrew behind the looper cover) needed tweaking. However, as I'd not tested my machine before attending the course, I didn't know that the darned thing was stuck and I couldn't budge it for love nor money :( We even tried some jewellery pliers they had in the storage for other classes on it but no dice! I'll try again this weekend with the strong houshold pliers in our toolbox at home!! And, the needle-plate screw didn't fit my screw-driver *sighs* so I couldn't practice rolled-hems on my own machine, as I needed to change the plate to do it :(


Shaking my fist
Shaking my fist at my uncooperative overlocker

Here's a picture of my finished napkins :) I think they'll be great for a picnic in the park when the sunshine returns ;)!

Napkins
My finished napkins - complete with rolled hems!

So, as soon as the grand sewing-room makeover is finished (Hubby and I reckon by end of the 2nd week in September - fingers-crossed!). I shall try my hand at a simple T-Shirt, maybe one of these FREE patterns by pixelink on BurdaStyle which I've already downloaded and printed-off in readiness.

Batwing Top by pixelink
 
1 piece Kimono Tee by pixelink
So, I reckon that now I've broken the ice with my overlocker, I should hopefully very soon be making forays into the world of t-shirts, knits, and fabulously finished seams (yay  *with a big happy smilie face*!!)


P.S. I wantto give a big shout out to Michelle (thanks for playing tug-o-war with me and my trolley, to extract my machine from it's box LOL!) - I hope you find somewhere that'll service your Pfaff! And to Georgina (Georgia ?) I hope you get to grips with your Juki, if not sell her on eBay and upgrade to a nice shiney new model I say :)

Friday 19 August 2011

Part 2: Maybe It's Genetic?


Following on from my earlier post here part 1, this is the 2nd half of my post :)


Singer 224ML Machine
Mummy's Singer 224ML Sewing Machine

How Did Mummy Start Sewing?
Chatting with Mummy I tried to ask her where her sewing interests came from. And, truly it was the most enthusiastic I've seen her when talking about any topic EVER! I found out that she started sewing in the 1960's when she was 14 years old, she enjoyed admiring the fashions of older girls and ladies, but could not afford to buy things for herself in the shops (she was the youngest of 11 children, so I imagine that spare cash for the idle fancies of the young and fashion-concious was not readily available!). She had an urge to make for herself a dress with a fitted bodice, nipped in waist and full gathered skirt. But, that kind of style takes a lot of fabric to achieve. So, she bought some cheaper bedding fabric, plus having only a 19"/48.3cm waist at the time (Mummy is 'ickle - only 5ft 1inches/155cm tall) she had enough fabric to accomplish her aim. She didn't use a pattern - she just winged it, using her older Sister's sewing machine! The result came out so well, that her next door neighbour upon admiring her brand new handywork commisioned Mummy to make some pretty dresses for her two young daughters (who, if I understood correctly from Mummy were about 5 and 7 years old at the time). The neighbour supplied the fabric for the dresses, Mummy supplied the thread - and she was rewarded with a payment of some "proper" dress fabric. Pleased with this turn of events, Mummy realised that if she took on other projects she could earn enough money to buy her own sewing machine. So, she made things for people in her neighbourhood - and used that money to take evening dressmaking classes to improve her skills, and to buy her Singer 224ML sewing machine. A friend of hers was a photographer for a local paper, and his girlfriend asked to pose with her for the photo you see below left. Mummy made the blouse and skirt from her own self-drafted patterns. Turns out she never wholly liked anything worn by other people, and sewing helped her to stand out in her own individual style, and "To be different; unique". She liked to mix and match elements from other garments she saw in magazines or on the street. The picture on the bottom right shows Mummy at 19 years old (did the eyebrows man ;)!) still with the 19" waist in a self-made, self-designed dress at a fashion show. Mummy says that models back then often worked on shows say modelling just a line of coats, or something else and that they were expected to provide the rest of the clothing (and makeup/hair) themselves. So, she made her own!

Mummy 14 years old Mummy 14 years old Mummy 19 years old
Mummy in her self-drafted, self-made garments.

After her initial start into sewing at 14, Mummy, took on four part-time jobs at the same time! Modelling, Perfume Sales Lady at the Robinsons department store, wedding make-up for brides, and of course dressmaking. Ten years of saving up her hard earned wages later, she had enough capital for a sizeable deposit to purchase her own flat. And, a couple of years after that she trade-up for a bigger and better place. (NB: Mummy met and married Daddy in her 30's, so was pretty much an independant lady before she settled into married life and babies etc., and they did ship her sewing machine over from Singapore to the UK when they married)

It's funny - I can remember Mummy making me 1 or 2 things when I was little. And, she made my two brothers some matching waistcoat and trousers each (along with neck ties). But, I can't ever seem to remember her making things for herself - I guess having 3 small children all under the ages of 6 at the same time must really eat into your "Me-time". I do distinctly remember that we were never allowed to go near her sewing machine - and (see photos from my Flickr account below) it was always covered in many layers to protect it from dust, scratches, and sticky children's fingers (haha!).


I asked Mummy when was the last time she made something from scratch, and she wasn't very clear - but she did say that for my youngest brother's recent wedding (this April) she'd taken in a jacket all along the sleeves and down the side-seams because she likes the big 80's shoulder-pad look of the bigger sizes, but not how baggy they are on the body.


So, whilst I don't think we'll be setting up a wee sewing circle of just us two stitching-buddies anytime soon - it does somewhat intrigue me as to whether my obsession love of all things sewing comes from her, is it nature (hence the genetic of the post title) or nuture LOL :)? 

Part 1: Maybe It's Genetic?


This is a 2-part post: see the second half here.

Last weekend we went visiting to my Mother's house. It was a flying visit, so we didn't stay long (we were on our way back from a day-long visit to one of my brother's house nearby).

So, I was lingering in Mummy's dining room and as I was idly scanning my eyes over her bookshelves I spotted some sewing books. Now, Mummy and I have never had one of those archetypal, stereotypical Mother-Daughter relationships that families are supposedly meant to follow. [For which read: we have generally never gotten on, we are civil but not overly friendly, and we have never bonded over anything. I have no special memories of time spent/family events/occasions/touching moments during my childhood, teenage or adult years that involve my Mother - although there are many happy times with my Father, brothers and the rest of my family. Basically, as the old adage goes "You can choose your friends, but you can't choose your family" - and whilst there is no animosity present, we just don't hang out or anything like that.] So, you can imagine my surprise when I came across these alluring tomes! Had these tantalising vintage sewing relics been in my midst during my formative years; when sewing did not draw my attention in the way it does now, then maybe my pleasureable pastime might have come to fruition much sooner LOL! (Back then it was merely a useful tool when I wanted to crop some jeans into shorts, or hem a skirt bought in the local Oxfam for £1.50 I made 2 dresses that I recall, and not much else.)

Anyway I digress! So, I HAD to take some pics of course ;)!

The first two books that I pulled off of Mummy's shelves were by Adele P. Margolis (and spookily enough I already own copies of these very two titles myself):

01 Mummy's Sewing Books

Design Your Own Dress Patterns by Adele P. Margolis (1971)
ISBN 0263516741, Original cost £3.85
(I have the re-issued 2006, paperback edition now titled 'Make Your Own Dress Patterns', ISBN
0486452549).

How to Make Clothes That Fit and Flatter by Adele P. Margolis (1969)
ISBN 0385090641, Original cost £UNKNOWN.


I thought that was the lot, but as I put the Adele's back, I spied at the end of the very long shelf some more reading-marevls!

02 Mummy's Sewing Books

Clothes - Their Choosing, Making & Care by Margaret G Butler (1965)
ISBN 071342700, Original cost £UNKNOWN


Sewing for Men and Boys by Simplicity (1978)
ISBN 0918178002, Original cost £0.60

Curiously, Mummy seems to own a UK edition (it has 60p printed on the front cover). However, online I can only seem to find the US edition with $1 on the front. Flicking through Mummy's copy I've realised that the photo on the cover is different between the different countries.

Introducing Pattern Cutting Grading and Modelling by Margaritha Goulbourn (1971)
ISBN 713427108, Original cost £1.90


Introducing Pattern Cutting by Ann Tuit (1974)
ISBN 0435428608, Original cost £2.80

Betty Foster's Dressmaking Book (1979)
ISBN 0356063198, Original cost £1.25

McCall's Sewing in Colour (
(C) 1963, Impression 1977)
ISBN 0600024571, Original cost £2.95

Dress Pattern Designing by Natalie Bray (1974, 4th Edition 'Metric')
ISBN 025896944X, Original cost £UNKNOWN
This is the link to the current, modern 2003 Edition.

More Dress Pattern Designing by Natalie Bray (1974, 3rd Edition 'Metric')
ISBN 0258969725, Original cost £
UNKNOWN
Again, link for the latest 2003 Edition.

Tucked inside one of the books was a pink and white packet of Betty Foster's Dressmaking Design Paper. It's large paper, printed with squares, and the idea is that you use a smaller diagram of a pattern and transfer by hand all the lines, and curves onto the larger squares of the 'design paper' - thereby keeping everything in proportion to the scaled-down smaller diagram. (On a side note, it even looks like the company Betty set up to sell her products is still up and running in Crewe.)

More pics are in my Flickr photo set of the books here.

Please see my next post about How Did Mummy Start Sewing? for more! 

Wednesday 10 August 2011

The Bitch is Back!


And, about bl**dy time too we missed her!

The bitch is back! NO! Not Alexis Morell Carrington Colby Dexter Rowan - but her ultimate selfishness - Elaine, The Selfish Seamstress.

What are you looking at? (Image Source: The Selfish Seamstress)

Image Source: Wikipedia - the character Alexis from the TV show 'Dynasty'


Her last post was 2nd December 2010, her latest post today - that's like 251 days of a drought of selfishness *sniff,sniff* (not that I'm counting or anything ;)!)

Welcome back biatch :)!!

Monday 8 August 2011

'SewSimple' - New Patterns by Simplicity


So, I'm on the mailing list for SewingPatterns.com and this morning I found an email in my inbox from them promoting a $1.49 USD per pattern offer (with no limits on the amount purchased) for a new line of patterns by Simplicity.

Being a curious sort I clicked onto the link to see what all the fuss was about.

The new line is called 'SewSimple' and it appears to be a range of some basic styles for 'Misses' and 'Girls'.


Image Source: Left - SewingPatterns.com Right - Simplicity.com
I kind of liked the look of a couple of styles, Skirt 2003, and Sleeveless Top 2029. Clicking on the links for them on the sewingpatterns.com site didn't tell me much about the patterns (usually they have all the information on fabric requirements/sizes etc., but this time not so!). So, I did what I usually do - I popped over to the Simplicity.com site to see first hand, straight from the horse's mouth so to speak what the new range and the 2 patterns I was keen on where all about.

However - NADA! I searched all over the Simplicity site and there is no mention on this range anywhere!?! I'm thinking that sewingpatterns.com might of accidentally jumped the gun and posted the information ahead of schedule maybe? I even tried searching for the new pattern numbers and that drew a blank too.

Now, the Simplicity 'SewSimple' range is NOT the same as it's 'It's So Easy' stuff - that is unless there's some secret master plan to phase that line out ;)! They have different logos and brand colours (see below):


Image Source: Left - SewingPatterns.com Right - Simplicity.com


Next, I thought I'd try searching Google for any other news on the new range and all I could come up with was a range sold through the BMV group called 'Sew Simple Patterns' (mainly aprons, and wall hangings), or a small independent line from a site called sew-simple.com

So, it seems to me that there's a bit of a confusing message going out here, and not only that - but the possibility of some mix-ups down the line about ownership of brand-names LOL!

Thursday 4 August 2011

Boy Can I Shop!


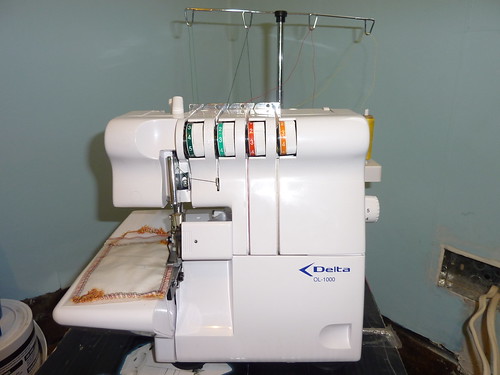
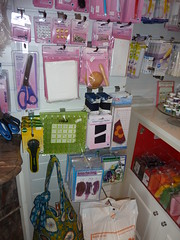
Okay, so we all know I'm a confessed book-aholic don't we ;)? Well it should come as no surprise that I have been merrily buying up [what must seem to my poor Hubby] the world's total supply of sewing notions, gadgets and supplies!

I could say here that I've lately been on an unprecedented shopping binge... but that wouldn't be very honest of me. Let us just say that lunch-hours + online shopping = ↑ sewing stash building, but also = ↓ bank-account funds (haha).

Though, to be fair I don't drink, smoke, have any pets/kids or go out partying (otherwise when would I have time to sew?), soooo I'm pretty much free to fritter away my hard earned wages on my pleasurable pastime as and when I see fit. This does not however mean I don't enjoy a good bargain. In fact I bloody well love hunting down the best and cheapest places to buy whatever book or gizmo that has inflamed my sewing passions. So much so, that it is not unknown for me to spend a disproportionate of time searching page after page on Google in order to buy whichever special thingie I've decided I simply cannot live without at that given moment in time, I've even bought stuff from Japan (but more on that later LOL!).


So, I thought I'd share a few photos of some acquisitions from the last few months with you :).

First off, I've purchased some great value items from Sew-Classic based in the USA and they have very reasonable shipping costs to the UK! Plus, when you purchase from them you can add a free PDF download to your basket, the file is a really handy 'Sewing Machine Cleaning & Adjusting Booklet'
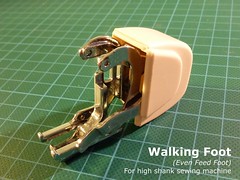
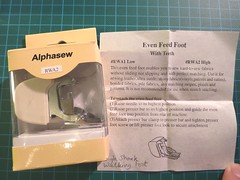
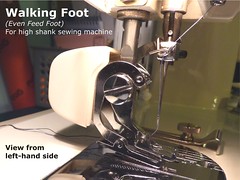
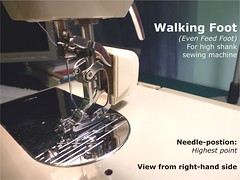
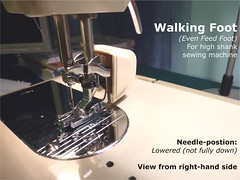

Walking Foot, Feed Cover Plate, Needle Plate Screws, and Presser Foot Thumbscrew


Walking Foot
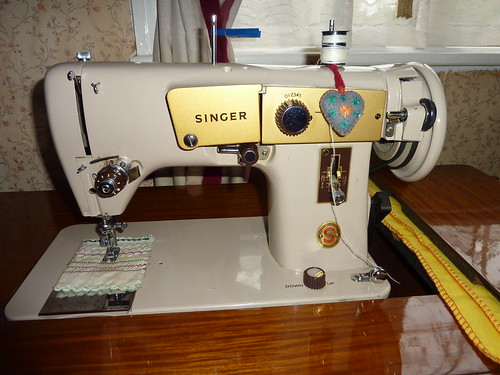
Walking Foot (also know as an 'Even Feed Foot') to fit my high-shank Novum Deluxe IX vintage sewing machine (sometimes also known as a 'Novum New Mark IX'). It was a measly $11.95 (yup only £7.27 - way cheaper than I've found in the UK).

01 - Walking Foot (High Shank) 02 - Walking Foot (High Shank) 03 - Walking Foot (High Shank)

04 - Walking Foot (High Shank) 05 - Walking Foot (High Shank)

The instructions were somewhat fiddly to understand! But after MUCH swearing and muttering under my breath and 20mins of sweaty fingers later... I got it on and working - with lots of help from page 108 in the 'Sewing Machine Attachment Handbook'!! Once I'd gotten then knack of it, it then only takes me 30 seconds to get it on (yay!). I've not tested it out on any fabric yet. But, turning the handwheel it makes all the correct movements to feed the fabric evenly top and bottom through the sewing machine - so this should be great for when I finally tackle sewing with knits (T-Shirts here I come LOL!).
 
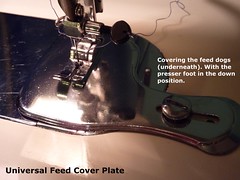
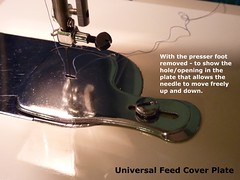
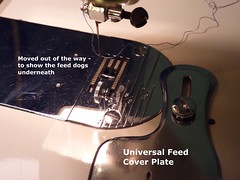
Feed Cover Plate - Universal (for use with my vintage Buttonholer Attachment)
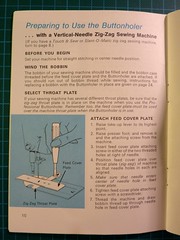
Last year I bought myself a vintage 1970's Singer Buttonholer attachment (untested as yet - but it came complete in it's original box plus manual, and with all of the templates present and correct). Now, what I didn't realise at the time was that in order to work the feed dogs (those little lines of metal teeth on the needle plate of the sewing machine which grab onto the fabric and move it steadily and evenly through the sewing machine as you stitch) need to be covered up with a special cover-plate, so that they don't move the fabric anymore. The buttonholer attachment works buy moving the fabric around to create the machine-stitched buttonhole.

01 - Buttonholer 02 - Buttonholer, Feed Cover Plate attachment instructions 03 - Buttonholer, Feed Cover Plate Models

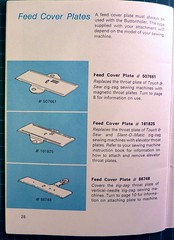
These are the Singer Feed Cover Plate part numbers from page 28 of my manual:
  • Feed Cover Plate #507661Replaces the throat plate of Touch & Sew zig-zag sewing machines with magnetic throat plates.
  • Feed Cover Plate #161825Replaces the throat plate of Touch & Sew and Slant-O-Matic zig-zag sewing machines with elevator throat plates.
  • Feed Cover Plate #86748: Covers the zig-zag throat plate of vertical-needle zig-zag sewing machines.

Unfortunately, the machine I want to use the buttonholer with is my vintage Novum, i.e. not a Singer, and therefore the manual only has suggestions for special singer needle plates that cover the feed dogs - NOT helpful to me.

01 - Feed Cover Plate 02 - Feed Cover Plate 03 - Feed Cover Plate

However, browsing the Sew-Classic store last week I noticed they had a universal feed cover plate for $6.99 (which is like £4.25 GBP!!), ermm how could I not buy it?

And well - it fits! It's yet to be tested alongside the buttonholer - but I'm hopeful it'll perform it's duties admirably.

Screws: Needle Plate, Presser Foot Thumbscrew (for screwing feet onto shank)
And, because I have a tendency to loose fiddly little bits from things (this is when I end up dismantling them to clean them), I picked a few of these up whilst I was at it too. The needle plate screws were $0.89 each, the thumbscrew $0.99 (54p and 60p respectively).


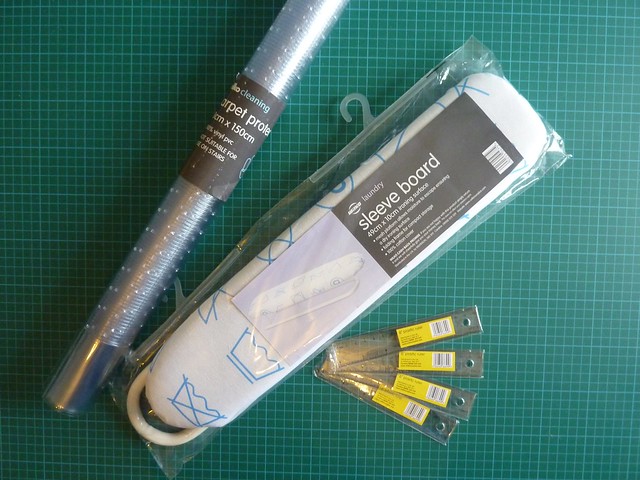
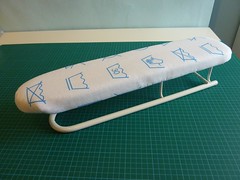
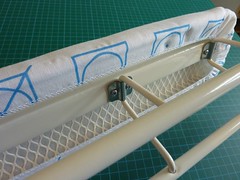
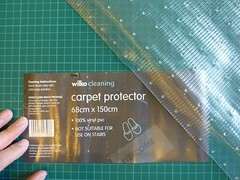
Then, from my local branch of Wilkinson (and I wasn't even looking for sewing stuff honest!) I picked up these:

Wilkinson's: Sleeve Board, Carpet Protector, Rulers
Carpet Protector, Sleeve Board, Small Rulers

The sleeve board £5.50 ($9.00 USD) has a metal mesh base to allow the steam to flow through, and it folds down pretty flat - so I might try to hang it on the wall to stow it away. I might even change the foam layer they've put under the cotton cover for some natural cotton wadding/batting in my stash - as I think it'll perform better during pressing. 

Sleeve Board Sleeve Board - View underneath of metal mesh

Sleeve Board - Folded down Clear Vinyl Carpet Protector

The clear vinyl carpet protector £4.00 ($6.60) is to help stop my dark carpet getting trashed with threads and tiny scraps of fabric, it should make it easier to sweep up all my mess :) The small 15cm/6 inch rulers... weeeellll they were only 10p each ($0.16) and I am ALWAYS loosing them, so the more the merrier haha!

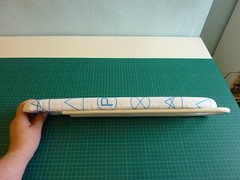
Finally... a Sneeky Peek
Here's a sneeky peek of my literally biggest recent purchase - all 7.7kgs (17lbs) of it! I'll give you a clue - it's 91cm wide, and is very, very, very long (in this case size does certainly matter hehehe).

Sneek Peek
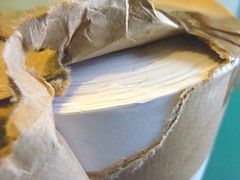
This was flippin' heavy to carry home on the train and bus when it was delivered to me a work I can tell you!